
The Mesa Boogie Story

After the great flood disaster in Germany's Ahr-region in Mid of July 2021 ...
It affected me deeply to see the people in my home in this situation. Including my mother, her neighbours and many of my friends who are still living there ... everything changes within a few
hours, while the floods raged. Unexpected, furious nature that takes it's bloody toll on this evening. Those who survived were shocked and unable to act in the face of the devastation that was
everywhere. Nowhere a spot that would have remained intact ... that would have allowed the roaming eye a moment of rest ... everything was destroyed. And some of them did not survive ... they
died in the floods.
It took me 4 month to write some words on this, too much was going on .... it was the time of the first cleanups. Helpers poured into the region on an unprecedented scale. Energetic, courageous
and compassionate at the same time. We could not have done it without their commitment. Again and again ... My deep thanks to all of them !
But also to our neighbours ... no one of them was spared, but all helped each other in the face of the disaster.
What a strong sense of community, that gives you hope to carry on in these times.
And then my beloved Boogie ...
It was located in the flat white building ... just there where the little red star mark the picture. Because of the huge amount of flotsam we could enter this building only 3 weeks after the disaster. Meanwhile everything inside was still full of mud and dirt ... :o(
Yes ... my Boogie was hitting really hard by the floods and without my neighbour Dieter it won't be here anymore (Thank you so much for that :o) But look at these pictures !!!
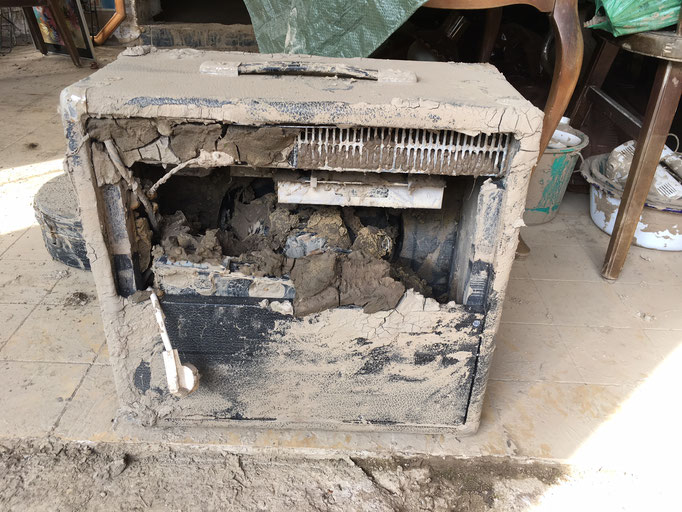


After a first inspection it seems to be impossible to get him back to a good working state. But I can't throw it away without trying my very best. So I first clean with water ... so muddy ... so much dirt.


I decide to work on the amp-chassis first. If the electronics can't be restored it make no sense to work on the cabinet. After uncount cleaning sessions with warm water and a lot of different brushes it was ready for demounting the electronics and all connectors.


After demounting the reverb-tank, the now mostly empty chassis could be cleaned again ... I used different kinds of sandpaper for the chassis plates and my glass fiber pen for the reverb tank and for edges and corners of the housing. These glass fiber pens are really good for this kind of work ... You should take care about the little fibers that come off during use, they sting quite a bit.


After cleaning the electronics with a lot of warm water I try to clean the potentiometers and all connectors in a ultrasonic bath. These things are normally used to clean glasses or any kind of jewellery. As I could say now ... they work perfect for this job too :o) All potentiometers are then prepared with Deoxit F5 Lubrication and a little bit of Deoxit Fader Grease. After that the electric function and the haptic feel are good enough for a first test. The remounting could started ...


Then the first test of the main transformer could start. I disconnected all cables from the secondary side, only the primary side of the transformer was connected. I switched on ... measured all
AC Voltages on the secondary side. They didn't show the correct values ... they are drifting heavily and after some minutes of operation, accompanied by soft crackling sounds from the transformer
itself, the main fuse was blown again. A deep depression overcomes me (this takes round about 5 minutes :o) ... Is this the end ??? If the main transformer is dead, maybe the output transformer
is defective too ... maybe ??? And to get a appropriate spare part for this one is really hard ... Time for a break, to think it over.
After some days I got an idea ... I remember my TT66 Tube-Amp Kit from Tube-Town. It's really not comparable to a Boogie, but it has a very sturdy Power supply. After some research I realize that
the main voltages are nearly the same as in Mesa's Amp. Ok ... one voltage is completly missing, but it only supplies the foot-switches in the Boogie ... for a first look this seems sufficient.
Happy again I started to prepare a new test. Setting up the TT66 Main Transformer and connect it's AC-Outputs to Boogie's AC-Inlets. The only other connection that I made was a proper grounding
of the Boogie Amp-Chassis. You know ... safety first :o)
I start with only one Preamp ECC83 Tube supplied. Switch on with fingers crossed ... the ECC83 slowly start glowing ... I measured all DC-Voltages and they are there !!! :o) Then I supplied
all remaining tubes and connect a 4 Ohm Load Resistor instead of the speaker. Again ... switch on, plug in my Tele and play some notes ... As I can see on my old Tektronix Scope this amp is
working again :o)
For the last test I connect the Jensen Speaker from my Princeton Amp to Boogie's Output. Look at the photos ... This shows "The Rebirth of the Amp-Chassis" ... nearly 4
months after the great disaster !
One word to the safety during tests with open housings ... Always remember that there are lethal voltages inside your Tube-Amps ! If you are not familiar with the safety regulations for work with eletrical equipment, you are not able to recognize, nor to take that risk ! In that case it's better to ask a qualified technician.


Ok ... never operate a Jensen Speaker on a Boogie ... At my opinion there are a lot of speakers that fit much better ;o) But for this test it was enough. It showed me, that only the main
transformer was dead. The Output transformer and everything else on this amp-chassis is still working.
:o) I'm a lucky man :o)
Stay in tune ... and be prepared for the second part of the story ... (new transformer, complete chassis test, rework the cabinet, new speaker ...) ... To be continued
Boogie Restoration Part 2
After some days of pure happiness about this result I ordered all neccessary replacement parts at TubeAmpDoctor TAD in Worms. That was mainly the Power Transformer, some capacitors for the Power
Supply, and a 12'' Celestion G12M "Greenback" Speaker with 25W Nominal Power. The "Greenback" decision was really easy for me ... I want to have one since years and I like it's tonal character
very much ;o)
I start with changing the power transformer. As you can see it is much bigger than the original part. I think that this isn't really neccessary, maybe a compromise in designing a sparepart that
fit's in more than one amp, but it let's expect a more overall stability of the Power Supply. In other Amp-Designs, I speak from these ones that features a rectifier tube, this matters much more
than in a Boogie whose rectification is done with modern silicon diodes. To change electrolytic capacitors in a 40-years old amp is always a good idea, and it is a cheap solution to protect
against hum-problems. The chassis needs a little Bit of mechanical work, but then the "oversized" transformer fit's pleasantly.


Then the cabinet-work began ... look at the starting point ... I already cleaned it more than one time ... as good as I can. But mud and dirt in each corner, inside and outside, in the tolex-grooves as well as everywhere. No words for that ... and no help for the "Vintage Black Shadow" speaker ... :o(


I demounted everything from the chassis and started to clean with warm water and different brushes, soft ones .. hard ones, big ones ... short ones ... toothbrushes and nearly everything that even looks a little bit like a brush. It got cleaner and cleaner, but a light brown veil remained on the black tolex. No brush could reach the mud that sits at the lowest point of the tolex-grooves and this was the reason for that light brown veil. I only realized it, as I examined the surface at twenty times magnification. Then you are able to see the mud ... and I am able to loosen it with a really sharp blade ... ;o) What a work ... but take a look at the result:


The front-board was the next challenge. As you can see ... and you don't believe this ... there was mud ! I decided to clean it as good as possible and to repaint it :o)


Next step was the speaker preparation ... Frontload ... Backload ... I don't know if this makes a tonal difference, but there was a optical reason to mount it from the front ... You already suspect which reason ? ... the word has 3 letters ;o)))


Mounting the Speaker in the cabinet ... no words for this ... take a look at your own ...


Boogie's rebirth ... I'm very proud :o)


During the restoration I think about how it might sound with a different reverb-tank. I remember to read about a guy who already implemented this, and after a look at the schematics I decide to add a interface on the back for a switchable external reverb tank.


Now ... the work is done. As I started, I don't know if this goal could be reached. Too much roadblocks that must be lifted first, before you can decide to go on or not ... But from the beginning on it was no option to throw it away without trying everything possible. Yes ... it was a lot of work, knowledge, and a great portion of luck neccessary to close this restoration succesfully. But now it's done ... "Don't loose your hope ... there are always possibilities !"


